Showing posts with label Project Life. Show all posts

Friday, July 3, 2015

Happy Birthday layout - From a sketch

Happy July to everyone!! We celebrated Canada Day here (on July 1st) with style as it was my youngest son's birthday and he got to pick his day.  I set a limit on birthday parties at age 10 (as at that point I had then put on 20 kid parties and was both exhausted of them and broke!! haha) so he got to pick the menu for the day and 2 activities to do.  Here is what the hidden journalling reveals:

1. Pancakes for breakfast, with bacon!
2.  Open presents and then SURPRISE!! a new kayak down at the lake for you and a paddle around.
3.  Go carts!!  Two rides and the 2nd it was just you and Garret.
4.  Hot dogs for lunch, with chips!
5. Glow-in-the-dark mini golf.  That was so cool.
6. Pizza for dinner.
7.  Ice cream cake for dessert.
8.  Some friends over to play video games until 9:00 pm!!  (and don't forget the game that Garret downloaded for you as his gift.  You really liked it.)

I used this week's sketch from Citrus Twist and actually did this on the floor on quick work breaks so no video on this one.


Thanks for stopping by!!

Jen

Friday, June 26, 2015

Project Life - The catch up :)

Good afternoon,

I wanted to hop on here and share 3, yes THREE, PL layouts I did today.  None of them have videos as I did my "lay it out, work on it on breaks" method of getting them done.  All were done today in a likely time of 30 mins or less each layout.

The first I used up the last of the scraps of my Simple Stories "I Am" collection 6x6 paper pad and sticker sheets (still have some stickers and other embellishments as you get TONS).

These 2nd two are using up the scraps and embellishments from my May Citrus Twist kit.  I have my June kit and definitely had enough left to do more layouts but as I really wanted to get my PL done first... I used it up for this.  I have about 1/2 a 12x12 sheet left of one pp and the rest are little bits.


Hope you enjoy! I will be back soon with some news and a new schedule for my You Tube channel.

Jen

Tuesday, June 23, 2015

Quick update!!!

I just wanted to pop in and say I have a layout and video up on the Layout-A-Week blog today here:
http://layout-a-week.blogspot.ca/2015/06/for-love-of-beach-week-24.html


You Tube:


I just posted this Project Life video on Monday:


This third edition of my "Lifted" series that featured Irit Landgraf: (her YouTube)


And this Open the Box video of my June Citrus Twist kit:


AND... last but certainly not least... drum roll please....

I have a layout in the Summer issue of Scrapbook and Cards Today magazine!! So excited. I am on page 65!!!!  (literally totally thrilled)


Coming soon...

I have 2 new videos (a new Lifted and a 12x12 from a Citrus Twist sketch) coming soon.  Here's some sneaky peeks:


Thanks for stopping by!!


Thursday, May 21, 2015

Project Life - March 23-29, 2015

Happy Thursday and I am here to share my most recent Project Life spread.  I am slowly doing a catch up but... seriously I need to hurry up and catch up as I think I am not farther behind. I might need to start doing 1 recent and 1 behind layout at a time and meet in the middle :)

Here is the layout itself:


And I don't usually do close up of each card but here are a few. I used the Sketch Class that Citrus Twist did and for each sketch you use and add to the gallery you are entered for a monthly draw. I have NEVER used a sketch for my PL before but numerous times in the class the contributors did so I thought, hey, I should give it a go and ended up using 5!!!


Sorry, no video this time!  My phone was almost out of battery last night and my cord won't reach when it is on my recording clamp.  Next time!

Jen


Thursday, May 7, 2015

National Scrapbook Weekend

Well, this past weekend was AWESOME and I found I wanted to play everywhere and just couldn't. So I mostly used the challenges over at Hip Kit FB forum and with some inspiration from Pinkfresh Studio's challenges (which I had hoped to do more of, maybe still might make it as I have til Saturday).  I also was playing along with the super fun ladies at Victoria Marie FB group in the challenge to get 10 layouts done over the weekend.  I managed to get 8 layouts done in all:

This layout was inspired by a challenge to use dimension in your layout but also a Pinkfresh challenge of using gold, aqua and pink.  That background paper was my starting point.

This challenge was an idea I got when I saw a challenge on the PinkFresh/Winnie & Walter NSD to make your own background. I used watercolours to mimic the water in this AMAZING photo.


This layout is pretty simple and was a symmetrical challenge, how do you translate symmetry? For me it was using the colours in the photos in the background and ensuring when a colour was not present that I added it (ie yellow and blue to the green pp).

This was a black and white challenge. To use a B&W photo and ONLY neutral embellishments and then a hit of colour.  I love it. I did the background with a stencil and some citron Color Shine.

This was my OLW for Apr and a balanced challenge.


This was a pastel colour challenge.

This challenge was to use just one colour to add contract to a B&W layout.

Thanks for stopping by!!

Sunday, February 15, 2015

Project Life process video

A quick post to let you know I got a process video done today and uploaded.  I used up the scraps from my January Hip Kit to get 2 weeks of my January Project Life done.


Thanks for stopping by!  Next up is a walk through of my portable Project Life bag that I take with me whenever I have to hang out for a while waiting on my kiddos.

Jen

Sunday, January 25, 2015

My 2014 album in review

Well, I decided this year to take on the task of photographing my entire 2014 album and putting it up on my Flickr account.  I thought this was the best way to get them put in chronological order and so they were all photographed in the same light.  (which, FYI, I finally figured out a good way to photograph my layouts. It is still a technique-in-progress but I am so much more pleased with how they look).

I am not 100% sure how these will come over via link so bear with me if this post gets changed up a few times.  Also, my album is not 100% complete.  All the layouts that are going in there are in there. BUT my project life is only done until Nov 10th.  It is prepped but I am saving it to take with me to a crop in early February.

So this made it really simple for me to do a count of my completed layouts and PL as well:

Layouts - 56
Project Life - 50 to date (8 to finish so a total of 58 - this is due to inserts)

Here is the entire album as it is in my binders (3 WRMK D-ring 12x12 faux leather Cinnamon binders):

https://www.flickr.com/photos/organize/?start_tab=one_set72157650404865521

Here are just the layouts (complete):

https://www.flickr.com/photos/82963875@N04/sets/72157650003451468/

Here are just the Project Life (incomplete):

https://www.flickr.com/photos/82963875@N04/sets/72157650404865521/


I am still researching if there is a better way to do this but let me know how this goes!!

Jen

Check out my YouTube Channel!!

Friday, November 14, 2014

Project Life - Sept 15 -21 - Using my stash

Hey everyone,

Here is my latest project life layout.  For anyone who hasn't been here before, I do my Project Life a wee bit differently.  I only do 1- 12x12 page protector for each week (with occasional double spreads for long weekend weeks) and I don't label as "Week 1, Week 2, etc"  I just put the dates.  I also don't date each photo although the journalling sometimes says which day.  I pick highlights from the week and if there is something I really want to do more on or a special event I then do a 12x12 scrapbook layout.  They all go together mostly chronologically in my albums.

So this is September 15 - 21 of this year.  It is the last prepped PL layout I had from when I went to a crop at the end of September.  I've started the new habit of leaving the photos laid out on my work space and as a result I've gotten about 6 weeks of PL done in the last 3 weeks, just doing a little bit at a time. I just sent in a big PL and layout photo order to be printed that will catch me up to Nov 9th and I will just keep doing what I've been doing by laying out each week.  I should do a post on my process for this!

Today I wanted to use up some stash so I started with some older Elle's Studio 4x6 cards, some Scraptastic TLN 3x4 cards and then 2 sets of die cuts I had (black & white are Studio Calico and blue/yellow are Pink Paislee).  Both sets of die cuts still have tons and tons and tons left in them :)

I left it nice and simple which is my usual style with a bit of journalling on each day. It's that tree amazing?  I had to highlight it.  Even this truly doesn't capture how huge it was as it was almost as wide as it was tall.


I also had a look at my last PL share which was from Jan to June 1st.  I will be taking photos from June 1st up to this one and will do another share with a slideshow soon!

Thanks for stopping by!! Have a scrappy day.

Jen

Friday, May 16, 2014

Have bag... can scrap!

So as I posted previously, my husband surprised me with a trip to the mainland to scrap with my awesome scrappy friend Sweet Scrapista last weekend.  His challenge to me beforehand was: "you know that bag you have?  Fill it up with stuff to scrap."  Yah, sure no problem, as every scrapper knows there is the eternal battle of what to bring, what to leave, do I have everything, etc.

Luckily enough for me, I had prepped a bag to do Project Life on the go earlier this year and so had a great head start.  Sweet Scrapista gave me the idea to do a PL bag and Mercy Tiara helped me figure out the how (she had a great YouTube about using the Bag in a Bag to take stuff on crops, she didn't use it like I am but the SECOND I saw it the idea formed in my head!)

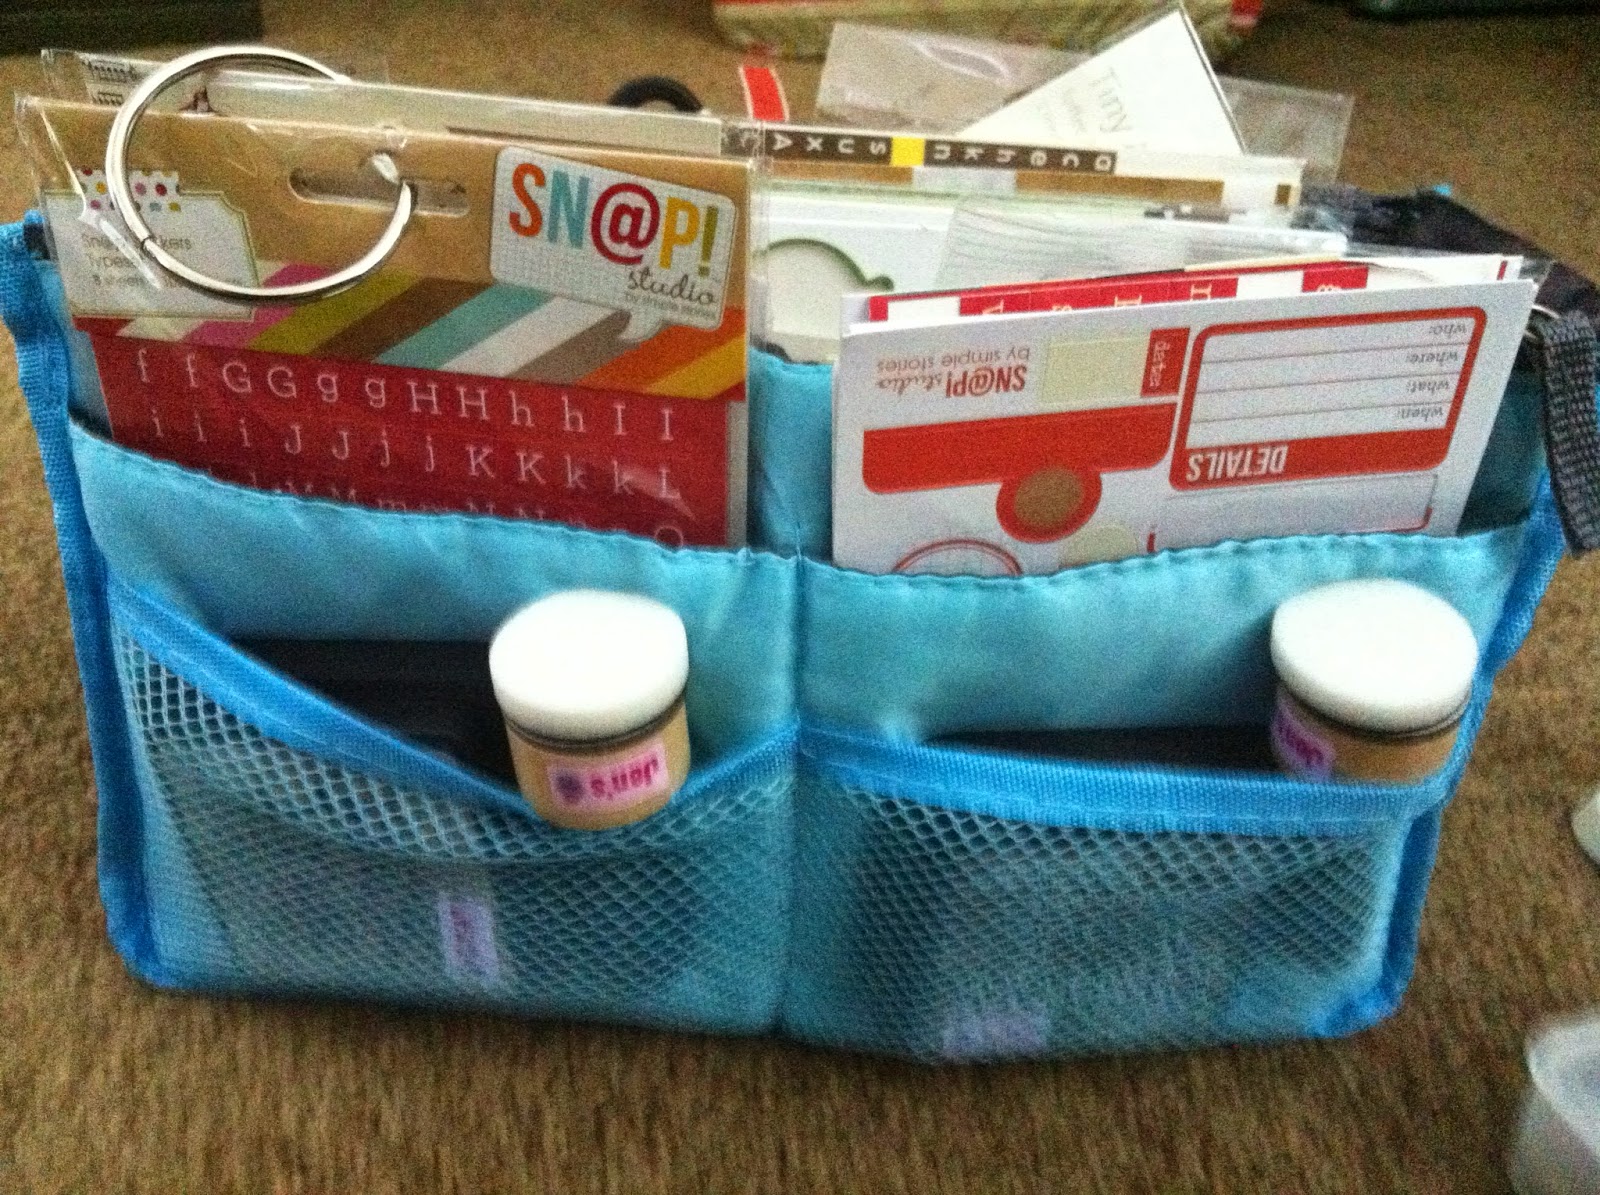
So, I made a list of what are the absolute essentials I need (oh, and bought a Bag in a Bag) and then after using the bag a few times casually I added more and kept a running list of additions.  I just got a small Simon Says Stamp order in that filled it out the rest of the way and so here it is:

ALL the stuff I stuff into my Bag in a Bag (sorry it's blurry but I'm not pulling it all out again, I did edit my foot out of the shot at least! LOL)

For PL I always use small alphas, write journalling, stamp on dates, round corners, staple, ink, need adhesive, etc... I use book rings for all my embellishments now (except loose ones of course) and the one on the bottom right is all leftovers from kits to use up.  The bags are extra clips, flair, and labels, etc that are loose.

So here is me actually getting almost ALL of this into the tiny Bag in a Bag (yay, these aren't blurry, my iPhone is going!):

(note my new Tim Holtz mini ink applicators!  So cool! Perfect for this bag as the regular sized ones did not fit well at all)


I then use a bag I bought at CKU Seattle 2 years ago, an empty PL page protector box, a portable trimmer and an empty Studio Calico PL kit box (don't get their kits anymore, but the boxes sure are awesome) to round out my "Go Bag".

I use the SC box to put 4x6 and 3x4 cards, as well as matching washi tape (fits a lot of cards and tape!!). The PL page protector box has empty page protectors and an envelope of printed photos sorted and ready to be added.  With all this I can do PL anywhere (like waiting on kids or on the ferry)

I took this bag and 2 loaded up layout boxes (another post to come on how I prep layouts for crops) and I was able to scrap all weekend long with no issues. The ONLY thing I needed was 2 sheets of white cardstock when I decided I needed to mat some photos and hadn't included it in my prep. Luckily Sweet Scrapista has a bit of a stash of supplies (ahem, understatement, ahem, cough, LOL)

Here's the packed bag:
(see I labelled that SC box - it says "cards and washi" as I do have another empty one I sometimes use too.  I like using washi tape to label stuff like this as it's easy to take back off and easy to write on.)

Hope this makes sense, if not feel free to ask in the comments!

Jen

PS I also ordered myself label's that simply say "Jen's" from Mabel's Labels.  I add them to all my supplies that go to crops and it is way to easy to get stuff mixed up and that makes it very simple to know what is mine and what isn't!


Monday, October 28, 2013

Jen's Studio - Project Life

I hope to share with you a series of posts all about my current organizational system for my studio. I say current as it is ever evolving as my needs change or I see/think of/find a better system.

I found this amazing quote today that sums me up pretty well:

" Arrange whatever pieces come your way."
Virginia Woolf

I find my life and my ability to cope with my life is really helped by being organized and having an "everything in it's place" attitude.  Not everyone is like that, hey, I know some people who find this really stressful! But for me, I am MORE stressed out when things are messy, out of place or not organized.  So I try to find ways to help myself be settled without taking too much time, energy or space.

Here is how I am organizing my Project Life supplies:


 First off, my PL core kits. I've never actually BOUGHT my own core or mini kit. I've only shared with someone else.  I have several different sets thanks to a friend being willing to share (Thanks Sweet Scrapista!). I put them all in a core kit box standing up and used scrap paper and a label punch to make finding what I want easy.  The quote cards (from Elisa Blaha's blog FREE) are also there so I don't forget and are in front of my lined PL 3x4 blank cards.  This system also cost me nothing. Bonus!


For all my non-Project Life brand stuff I am using these monthly kit boxes from Studio Calico.  I signed up for their monthly kit subscription in the summer but only ended up getting 2 kits.  It seemed to me (this is just MY opinion!!) that the quality and amount of product in the kit diminished around that time and living in Canada the shipping time was just not acceptable. I wasn't receiving my kits until AFTER the next reveal which was NO fun at all. I complained but was told unless I bought more stuff (!!!!!) that was that for shipping speed. I was not cool with that so I paid the cancellation fee and got out.  But the boxes they came in are perfect for storing stuff. So all the 3x4 cards go in one and all the 4x6 cards go in the other. These are cards from the kits, from cut apart sheets, journalling pads from other manufacturers (like Basic Grey's new line of pocket-style scrapping).


Lastly, these both go together in an empty PL page protector box on top of my Expedit 4x4 cube shelf.  This unit is in the closet in my studio (a 4th upstairs bedroom in our home that I use as office/studio).  We took the doors off the closet and this fit right in.  I can then easily lift it out to work on my PL spreads.  I plan to also add a portable bag with basics to the back of the box (see Mercy Tiara's blog post on Bag in Bag - hoping to use her idea for this! - a portable PL kit with markers, stamps, adhesive, etc that I can take to other areas of the house and work on while my kids do school work.  It was like she READ MY MIND!!! I had just finished saying to my FB scrappy buds I wanted to build a kit like this and was figuring out what might work and BAM, she posted this about 4 days later.  I was stoked!)

Tomorrow I am going to show you the REST of this 4x4 unit and also how I store my monthly scrapbook kits (hint, Mercy Tiara helped me out AGAIN). They are right behind this PL box on top of the unit!

Happy Scrapping!

Jen

Sunday, October 27, 2013

PL Sunday

Well, I kept going on Saturday with my Project Life spreads.  I did clean my office too (I'll post a pic on Monday) but most got done on the floor as I used up bits and pieces rather than having to put them away.  It's motivating when you know you need to clean... I use up so much stash that way :)


This week I had a full "side" but had a couple extra pictures I also wanted to use.  Rather than trying to fill up another full page protector I found an insert to put in the few extra pictures.
I look at it now and see I really was cramming a lot in so likely just doing a double page spread would have worked better with a couple filler cards.  Oh well.  Used mostly Elle's Studio on this one.
Here's the front side of the insert for the same week.  We had all gotten new shoes the weekend before and I thought it was cute we all had New Balance so took a picture. It also surprised me with how BIG my boys feet are now.  Not so very far off from adult sized shoes!

Filler cards, a picture of a friend's baby wearing a sweater I bought when she was born (bought it big as they didn't have any smaller sizes but was SO cute I had to send it!!)
Also used this "everything is going to be OK" card as life was very hectic and crazy and I was feeling it a LOT this week.


Here the next week.  My youngest and I were fighting colds so got a shot of our bodum of tea (we drank a LOT of it all week to help with congestion and achy bodies)  I also got a few random everyday shots of us.  A Costco run, my son doing school work, a failed dinner where we ended up having tuna melts as the chicken wasn't ready, a cool display of apples in a grocery store.  I also documented our ferry ride to Vancouver.  We live on an island but it's big and has most everything here so... I think we forget sometimes it is an island!
And here is the next week (and caught up now to the spread I posted Saturday!).  Again, taking pictures of everyday things; T to B, L to R, : big grocery shop that I prepped for easy dinners, my son at art class, my first attempt at making calzones, me at the hairdresser finally getting my hair done after months and months of having to cancel appts, my husband WAY up on a scary ladder changing the light bulb on our 2nd story ceiling fan (and cleaning it for me, yuck!!), my brother and niece, a Skype call with them and a gorgeous shot my husband took of Mt Baker when we were out doing family pictures that weekend.
This layout incoorporates Scraptastic, Simon Says Stamp and Noel Mignon kits!!  

Happy Scrapping! 

Jen

Saturday, October 26, 2013

Happy Scrappy Saturday!

Hi all!  I have some time today to scrap (also have a huge to-do list too...) so my first goal was to clean my scrap space up so I can work on my work space rather than the floor (as the work space is covered in piles from unpacking from a crop last month!!).  But I was mid-PL spread so I did that first, LOL.  On the floor.  Oh well. It's done and I'm happy.  NEXT I am cleaning up my scrap space.

Anyways, here is my PL for Oct 7-14.  I usually do just 1 side per week but this was a long weekend (Thanksgiving in Canada) so I did both sides as we wandered and took pictures over the weekend.

Here's the full spread!  I used bits from my Noel Mignon October kit and from the September Scraptastic This Life Noted grab bag (didn't buy the full kit, just the cards).  Think they worked quite well together.  I try not to buy must PL-specific stuff as: 1. I'm on a budget and my Noel Mignon kits take up that budget but also provide me with ALL the stuff I need to scrap all month long! 2. As I have a ROOM FULL of supplies and scraps and embellishments so I really don't need more stuff when I can just use that.

 Here is the left side.  I had my son fill in the details on his field trip.  (which unfortunately he did while distracted by the tv, should have removed him to elsewhere!)  But I'm glad his voice is on here and I added the postcard he'd hung onto after the field trip.  It's sideways but I don't care.  I wasn't with him on the field trip so happy to include something.

 This is the right side.  Our long weekend adventures (all the nature pictures) as well as a shot of our non-traditional Thanksgiving dinner (long story) and a picture of my niece.  She lives a day's drive away so I love getting pictures of her from my brother and SIL. I try to include special ones in our PL layouts. (this one is her first solid food).  She always has the funniest expressions on her face.

Hope you are all having a great weekend. It's overcast and cool here... so perfect scrapping weather!  (and chore weather, and get some school work done weather, and finish putting up the Halloween decorations weather, and... )

Jen

Tuesday, October 15, 2013

Project Life - Jen style

So as I posted a while back, I started Project Life (only in June... hard to believe as it feels like I've been doing forever now - in a GOOD way!).  I wanted to start posting my layouts on here with some regularity (notice I don't say weekly as... that is most likely not to happen as I tend to do monthly or biweekly at most!). I thought I'd do some catch up first and start with my first ever PL layout.  I didn't have any PL supplies with the exception of some page protectors, which I actually stole from my friend's PL baby album I was working on as her gift.

Here it is:

This was the week before the end of school and Father's Day weekend.  As I've mentioned, I am doing Project Life as this:

  1. Trying to keep each week to 1- 12x12 page protector.  Highlights only.
  2. I add these directly into my regular, chronological, family album. No special PL album. (I have a little video on this... need to figure out how to upload and edit!)
  3. The events that require/need/whatever a full layout get a full layout and as best fits they go beside, in front of behind the PL week they go with (and usually there is a highlight of same event on the PL page).
  4. I'm flexible!!! So sometimes with a long weekend the week gets a page and the long weekend gets it's own PL page too (so that week is 2 - 12x12 page protectors).  Or sometimes I do an insert (not often yet) if I have more to say or if there are sort of two themes to a week or something like that.
Things I'm trying to do to help me "keep up" with my PL but also my scrapbooking in general: (cause I am SUPER busy these days - aren't we all?! - and I just don't have the time I used to to scrapbook anymore)
  • download pictures at least once a month from all our sources (my phone, hubbie's phone, Nikon D90 and potentially my new little Nikon One -which I haven't been using... purely just not in habit to grab and need a case so I can put in my purse and leave it there!!)
  • have a supply of PL planning pages printed off so I can use. I scribble all over them and then tuck right into my album once I've sent those pictures off to be printed. Then when I can, I already know my plan (and usually as I'm planning I pick my cards too and put right into the page protectors...) and so...
  • when I have time, doing the PL pages is really a matter of cutting the pictures as needed and doing journalling and any extra embellishing I feel I need (which I don't have to really do ANY but of course, that's the fun part!!)
Last thing I want to now do... prep a portable PL "station".  Then when my kids are working on school stuff and don't need me I could bring it down and work on my stuff.  Then I'm not gathering a ton of stuff.  I need to really think about it but think it would include:
  • journalling pens
  • few washi tapes (neutrals, easy to use on most layouts)
  • scissors, tape runner, glossy accents
  • assortment of embellishments (think just grab my box instead of sorting out extra stuff)
  • small alpha stickers
If you have any suggestions, PLEASE, by all means leave me a comment on how to get this started.

I should be back tomorrow with a few more to share until we hit my recent stuff!!

Jen


Sunday, September 22, 2013

Week in the Life

I played along with the Week in the Life at Ali Edwards' blog this year. I hadn't done it before but for some reason this year I felt it would be great.  I found the number of pictures I took really decreased as the week went on and then I had a bunch again Saturday and Sunday.  I think doing different things those days helped to renew my interest.

I also tried using the app Collect to do this (fantastic timing on doing the Project Life Lessons class over at Big Picture Classes as it was mentioned during the class).  You add your photos in to a polaroid-style template and can journal right on that.  It's fantastic.  Here's an example:

 I can then save these to my Camera Roll on my iPhone, download to my computer and after cropping in Photoshop, I put two of these at 3x4 onto a 4x6 canvas and then can print.  So like this:


Then I just have to cut down the middle and put into page protectors. OH, and I decided to use my regular Design A Project Life page protectors.  Adding in 1 4x6 cover shot each day and then as many of these 3x4s as I can take.  When it isn't full, I'll add in journaling cards.  Here's one of the cover pictures. (I added in the Week in the Life and the day myself in Photoshop)

I just sent the entire week off to London Drugs to get it printed so I will be back to share how it turned out!!  Each day will be 1 - 12x12 Design A page protector so I'll take shots of each day and put them in.  BUT, you won't get to see for a week as it's all going to Crop for Kids with me this weekend (Sept 27-29).

Keep scrapping!
Jen


Saturday, September 21, 2013

Reveal for Memory Workshop - September Kit

I was totally excited to be asked to be the guest designer for the Memory Workshop September kit.  Sandra owns this BC company and does monthly scrapbook kits for a very affordable price with fantastic customer service!! Check her out!!!  No really... go HERE.  So I was thrilled to be asked and didn't even ASK her what was in the kit before I said yes as... well I just knew whatever it was, I would like it.

I am super late getting this reveal posted too!! Not from lack of enthusiasm, but more from a rather busy change in our life recently (I'm sure more will get posted on that later!!).  So, as I hang my head in shame over it's tardiness, here is the reveal:


I was asked to do 2 double page spreads with instructions (which, BTW, is harder than it sounds!  I'd never typed out how I did layouts before and I tend to "eyeball" stuff so there was me obsessing over stuff with a ruler.  haha)  This first is a spread from, ahem, 10 years ago :)  This is my eldest on his first birthday. I made him is own little chocolate cake to get into.  And he did. He really really did get into it.  (with a fair amount of encouragement from the older kids at  the party)


Number 2 double pager is these beautiful pictures my husband took this summer from around here.  We have only lived on Vancouver Island since Dec 2011 so the abundance of flowers here (like EVERYWHERE) is still amazing for us so we take pictures all the time. Like even in a mall parking lot cause there are flowers in the mall parking lot!!
Next I could do "bonus" projects with the leftovers with the request to make sure no papers were left uncut. (that sort of sounds like a Star Trek mission...yes, I'm a geek. If you've read my blog before, you'll know that).  This layout was of my boys and the gaggle of boys from our street who spend the VERY LARGE portion of their summer HERE. At my house.  In my house.  Around my house... well, you get the idea :)  This was them on the trampoline in my backyard with the sprinkler under it.  They were laying down so the sprinkler would hit them full force and they could then SCREAM very loudly about it when it did. It's a boy thing!
My 2nd bonus project was this amazing picture (and really, this doesn't do it justice) of Lake Garibaldi in BC (near Whistler, BC).  My husband and his brother hiked up Black Tusk mountain and this was their view.  It's a glacier fed lake.  Stunning.


Next, I asked Sandra was she interested in me doing some Project Life stuff with the leftovers?  I always do that with my scraps and she said GO FOR IT.  I am a very firm believer you do not need to buy stuff specifically for Project Life.  I swear right here and now, other than some SUPER OLD alpha stickers that every single bit of this was just bits left over from the kit.  I cut all the paper up into 4x6 or 3x4 cards, I used the manufacturer strip for accents (this kit was all Elle's Studio Saltwater and Elle always has AWESOME strips!!).  I made best use of it all and I think it looks great.  I even, sorry insert small pat on back here, was spotlighted over at Elle's Studio for this.  See HERE


And here's a 2nd page (does go beside the first in chronological order) I also did with the same scraps!.

And lastly, I took a picture of what I had left from the kit after doing all of this.  I think I can safely say... I KILLED the kit.  Not much left at all.  Those 2 pinwheels will get used on birthday cards though and those banners together on a 3rd!

Thanks again to Sandra for asking me to be guest designer this month!  I look forward to her event next weekend Crop for Kids that she helps organize.

Keep scrapping and I will be back soon with a TON of stuff I got done at the Crop!!  I am in full on prep mode at the moment so nothing new to show (which KILLS me!! I hate prep but... know it means I get a ton done while at the crop so I do it.  UGH.  )

Jen